# SAML2.0登录概述
让我们来看看SAML2.0依赖方身份验证在 Spring 安全性中是如何工作的。首先,我们看到,与OAuth2.0登录类似, Spring 安全性将用户带到第三方进行身份验证。它通过一系列重定向来实现这一点。
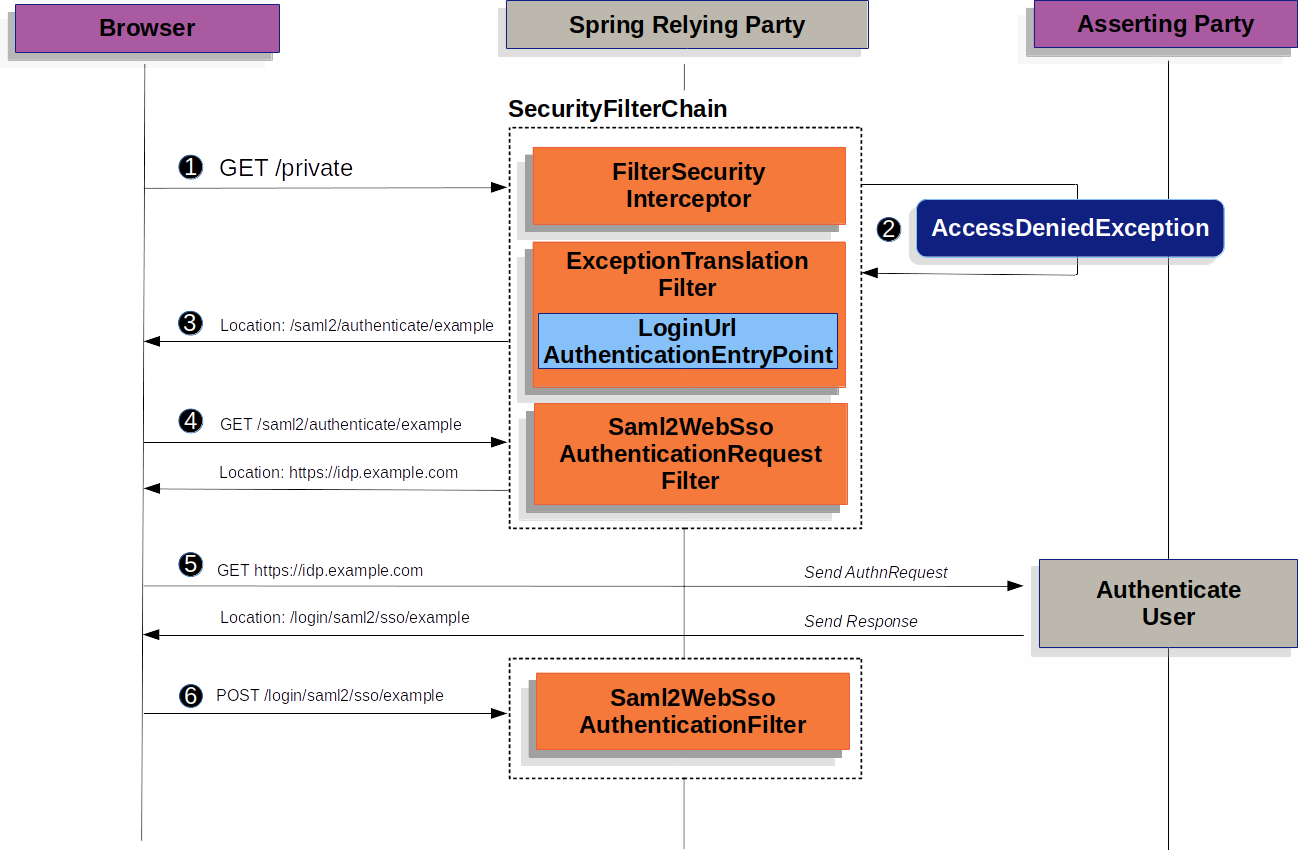
图1.重定向到断言的一方身份验证
上图构建了我们的[SecurityFilterChain](../../architecture.html# Servlet-securityfilterchain)和[AbstractAuthenticationProcessingFilter](.../../authentication/architecture.html# Servlet-authentication-abstractprocessingfilter)图:
![]() 首先,用户向资源
首先,用户向资源/private发出未经授权的请求。
![]() Spring security的[
Spring security的[FilterSecurityInterceptor](.../授权/authorization/authorization/authorization-requests.html# Servlet-authorization-filtersecurityinterceptor)通过抛出AccessDeniedException表示未经验证的请求拒绝。
![]() 由于用户缺乏授权,[
由于用户缺乏授权,[ExceptionTranslationFilter](../../architecture.html# Servlet-ExceptionTranslationFilter)发起启动身份验证。配置的[AuthenticationEntryPoint](../.../authentication/architecture.html# Servlet-authentication-authenticationentryPoint)是[LoginUrlAuthenticationEntryPoint](https://DOCS. Spring.io/ Spring-security/site/DOCS/5.6.2/api/org/springframework/security/web/authentication/loginurlauthenticationentrypoint.html)的一个实例,它会重定向到[<saml2:AuthnRequest>-genering-endpoint](authenticationcentification-exposit或者,如果你已经配置了多个断言对象,它将首先重定向到一个选择器页面。
![]() 下一步,
下一步,Saml2WebSsoAuthenticationRequestFilter使用其配置的[Saml2AuthenticationRequestFactory](# Servlet-saml2login-sp-initiated-factory)创建、签名、序列化和编码<saml2:AuthnRequest>。
![]() 然后,浏览器接收这个
然后,浏览器接收这个<saml2:AuthnRequest>并将其呈现给断言的一方。断言一方试图对用户进行身份验证。如果成功,它将返回一个<saml2:Response>返回到浏览器。
![]() 浏览器然后将
浏览器然后将<saml2:Response>发布到断言消费者服务端点。
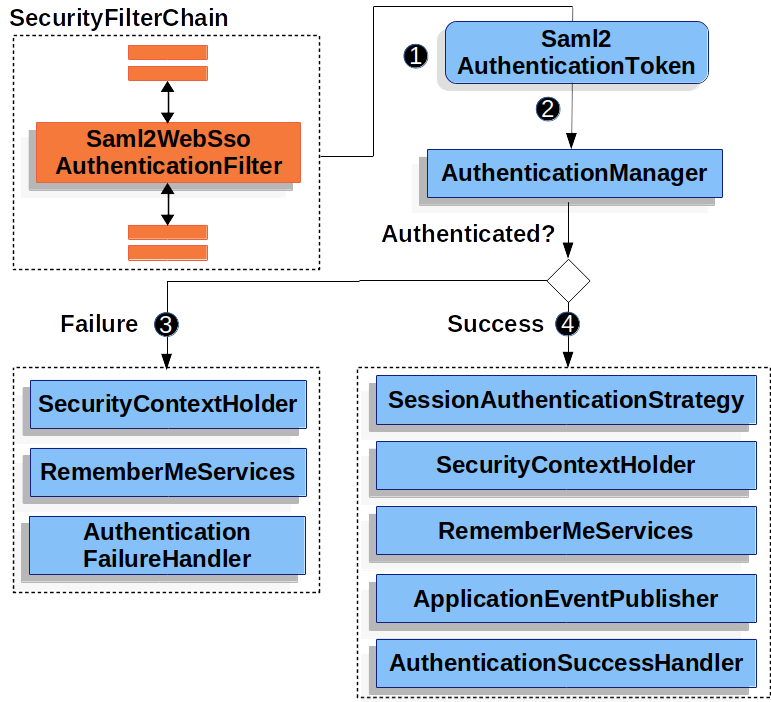
图2.验证<saml2:Response>
这个图是基于我们的[SecurityFilterChain](../../architecture.html# Servlet-SecurityFilterchain)图构建的。
![]() 当浏览器向应用程序提交
当浏览器向应用程序提交<saml2:Response>时,它[委托给Saml2WebSsoAuthenticationFilter](authentication.html# Servlet-saml2login-attenticate-responses)。该过滤器调用其配置的AuthenticationConverter,通过从HttpServletRequest中提取响应来创建Saml2AuthenticationToken。该转换器还解析[重新注册政党](# Servlet-saml2login-relyingpartyregistration)并将其提供给Saml2AuthenticationToken。
![]() 接下来,筛选器将令牌传递给其配置的[
接下来,筛选器将令牌传递给其配置的[AuthenticationManager](.../authentication/architecture.html# Servlet-authentication-providermanager)。默认情况下,它将使用[OpenSAML authentication provider](# Servlet-saml2login-architecture)。
![]() 如果身份验证失败,则失败
如果身份验证失败,则失败
[
SecurityContextHolder](../../authentication/architecture.html# Servlet-authentication-securitycontextholder)被清除。调用[
AuthenticationEntryPoint](../../authentication/architecture.html# Servlet-authentication-authenticationentryPoint)来重新启动身份验证过程。
![]() 如果身份验证成功,则成功。
如果身份验证成功,则成功。
[
Authentication](../../authentication/architecture.html# Servlet-authentication-authentication)设置在[SecurityContextHolder](../.../authentication/architecture.html# Servlet-authentication-securitycontexolder)上。Saml2WebSsoAuthenticationFilter调用FilterChain#doFilter(request,response)以继续应用程序逻辑的其余部分。
# 最小依赖
SAML2.0服务提供者支持驻留在spring-security-saml2-service-provider中。它是在OpenSAML库的基础上构建的。
# 最小配置
当使用Spring Boot (opens new window)时,将应用程序配置为服务提供者包括两个基本步骤。首先,包括所需的依赖关系,其次,指示必要的断言方元数据。
| 另外,这也意味着你已经向你的主张方登记了依赖方。了。 |
|---|
# 指定身份提供程序元数据
在 Spring 引导应用程序中,要指定身份提供者的元数据,只需执行以下操作:
spring:
  security:
    saml2:
      relyingparty:
        registration:
          adfs:
            identityprovider:
              entity-id: https://idp.example.com/issuer
              verification.credentials:
                - certificate-location: "classpath:idp.crt"
              singlesignon.url: https://idp.example.com/issuer/sso
              singlesignon.sign-request: false
哪里
[https://idp.example.com/issuer](https://idp.example.com/issuer)是身份提供程序将发出的SAML响应的Issuer属性中包含的值classpath:idp.crt是 Classpath 上用于验证SAML响应的身份提供程序证书的位置,并且[https://idp.example.com/issuer/sso](https://idp.example.com/issuer/sso)是标识提供程序期望AuthnRequests的端点。adfs是你选择的任意标识符
就这样!
| 标识提供者和声明方是同义词,服务提供者和依赖方也是同义词。 它们通常分别缩写为AP和RP。 |
|---|
# 运行时期望
按照上面的配置,应用程序处理任何POST /login/saml2/sso/{registrationId}请求,其中包含SAMLResponse参数:
POST /login/saml2/sso/adfs HTTP/1.1

SAMLResponse=PD94bWwgdmVyc2lvbj0iMS4wIiBlbmNvZGluZ...
有两种方法可以看到诱导你的断言一方生成SAMLResponse:
首先,你可以导航到你的主张的一方。它可能为每个注册的依赖方提供了某种类型的链接或按钮,你可以单击这些链接或按钮发送
SAMLResponse。其次,你可以导航到应用程序中的受保护页面,例如
[http://localhost:8080](http://localhost:8080)。然后,你的应用程序将重定向到配置的断言对象,然后发送SAMLResponse。
从这里开始,考虑跳到:
[如何使用
Saml2AuthenticatedPrincipal](authentication.html# Servlet-saml2login-authenticatedprincipal)
# SAML2.0Login如何与OpenSAML集成
Spring Security的SAML2.0支持有两个设计目标:
首先,依赖SAML2.0操作和域对象的库。为了实现这一点, Spring Security使用了OpenSAML。
其次,确保在使用 Spring Security的SAML支持时不需要这个库。为了实现这一点, Spring Security在契约中使用OpenSAML的任何接口或类都保持封装。这使得你可以将OpenSAML转换为其他一些库,甚至是OpenSAML的不支持版本。
作为上述两个目标的自然结果, Spring Security的SAML API相对于其他模块来说非常小。相反,像OpenSaml4AuthenticationRequestFactory和OpenSaml4AuthenticationProvider这样的类暴露了在身份验证过程中定制各种步骤的Converters。
例如,一旦应用程序接收到SAMLResponse并委托给Saml2WebSsoAuthenticationFilter,过滤器将委托给OpenSaml4AuthenticationProvider。
| 对于向后兼容性, Spring Security默认情况下将使用最新的OpenSAML3.,注意,尽管OpenSAML3已经达到了使用寿命,建议更新到OpenSAML4.x。,由于这个原因, Spring Security同时支持OpenSAML3.x和4.x。,如果你将OpenSAML依赖关系管理到4.x,<gt R=“110”/,然后 Spring Security将选择其OpenSAML4.x实现。 |
|---|
验证OpenSAMLResponse
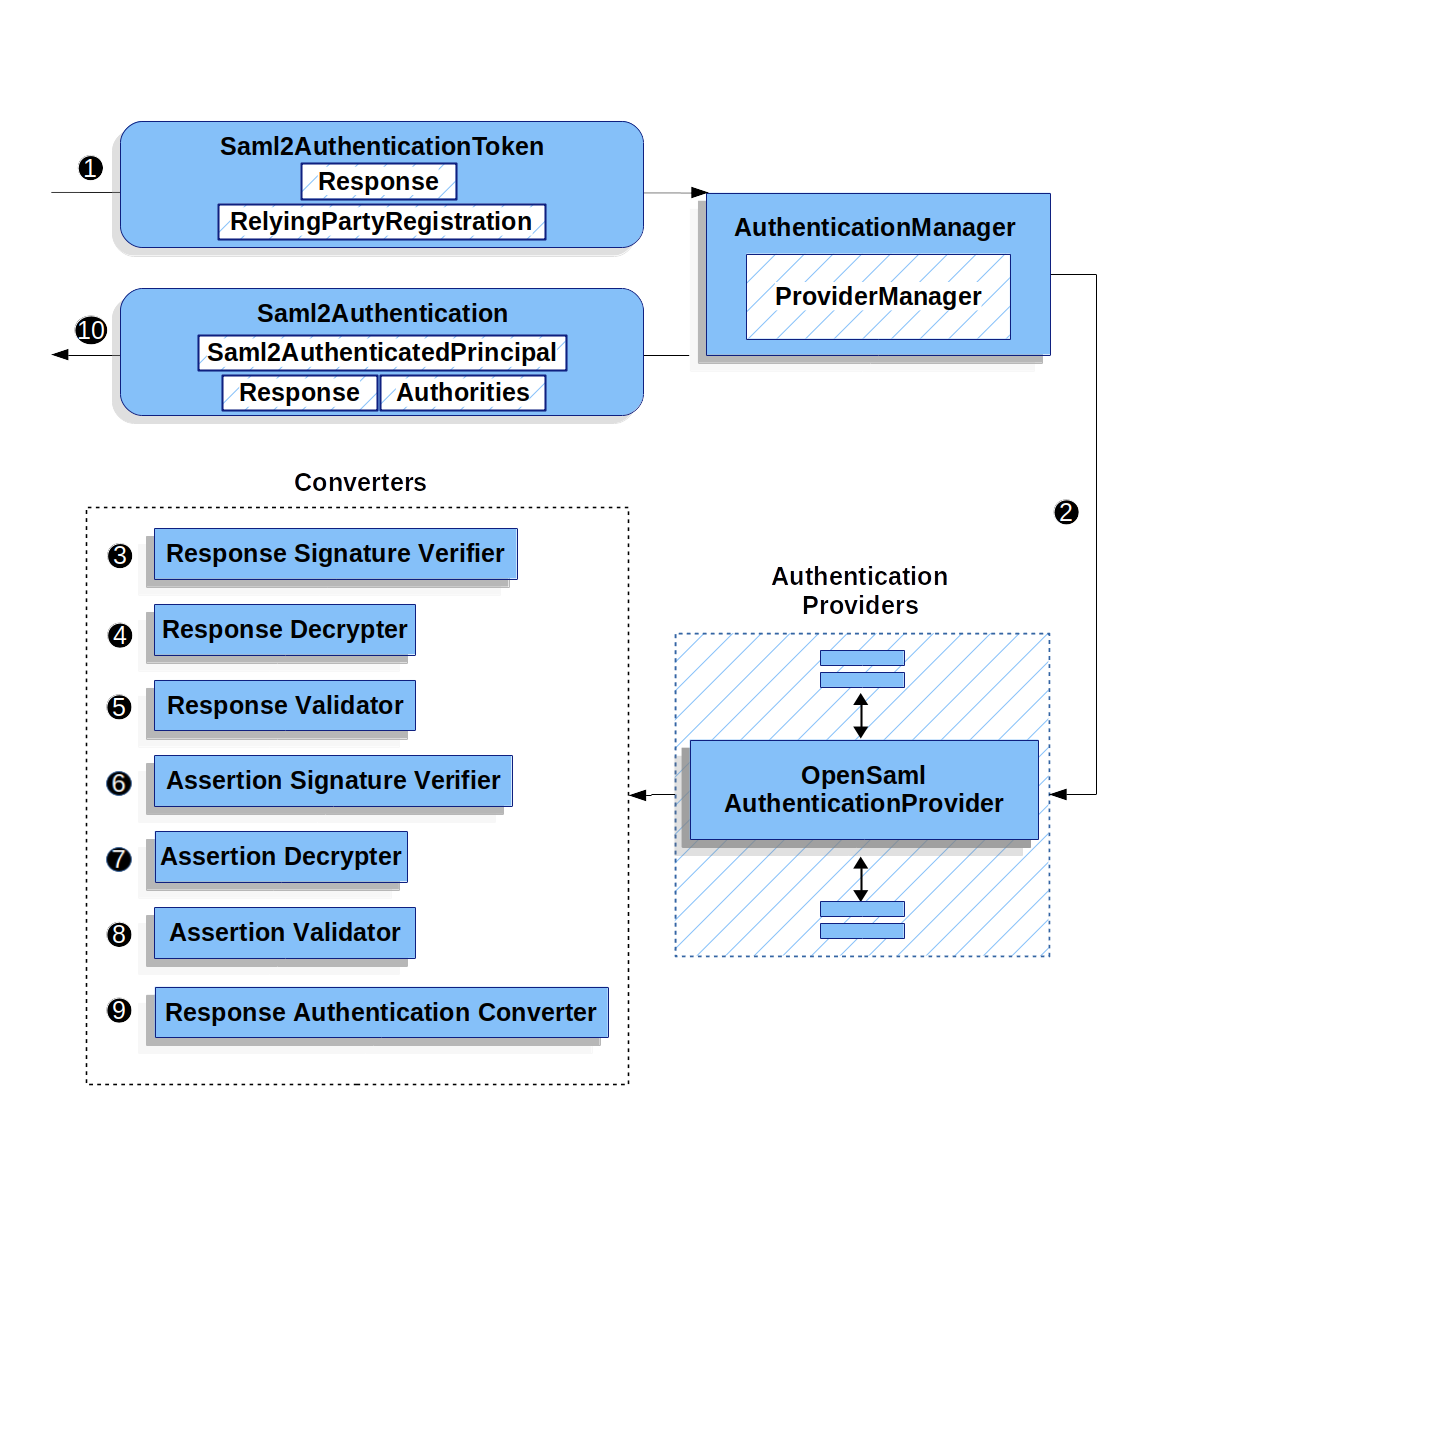
此图构建于[Saml2WebSsoAuthenticationFilter图](# Servlet-SAML2login-Authentication-SAML2WebssoAuthenticationFilter)。
![]() the
theSaml2WebSsoAuthenticationFilter表示Saml2AuthenticationToken并调用[AuthenticationManager](.././authentication/architecture.html# Servlet-authentication-providermanager)。
![]() [
[AuthenticationManager](../../authentication/architecture.html# Servlet-authentication-providermanager)调用OpenSAML身份验证提供者。
![]() 身份验证提供程序将响应反序列化为OpenSAML
身份验证提供程序将响应反序列化为OpenSAMLResponse并检查其签名。如果签名无效,则验证失败。
![]() 然后,提供程序[解密任何
然后,提供程序[解密任何EncryptedAssertion元素](authentication.html# Servlet-saml2login-opensamlauthenticationprovider-decryption)。如果任何解密失败,验证就失败了。
![]() 接下来,提供程序验证响应的
接下来,提供程序验证响应的Issuer和Destination值。如果它们与RelyingPartyRegistration中的内容不匹配,则验证失败。
![]() 之后,提供者验证每个
之后,提供者验证每个Assertion的签名。如果任何签名无效,则验证失败。此外,如果响应和断言都没有签名,则身份验证失败。响应或所有断言都必须具有签名。
![]() 然后,提供程序,解密任何
然后,提供程序,解密任何EncryptedID或EncryptedAttribute元素]。如果任何解密失败,验证就失败了。
![]() 接下来,提供程序验证每个断言的
接下来,提供程序验证每个断言的ExpiresAt和NotBefore时间戳、<Subject>和任何<AudienceRestriction>条件。如果任何验证失败,则验证失败。
![]() 之后,提供者获取第一个断言的
之后,提供者获取第一个断言的AttributeStatement,并将其映射到Map<String, List<Object>>。它还授予ROLE_USER授权。
![]() 最后,它从第一个断言、属性的
最后,它从第一个断言、属性的Map和GrantedAuthority中获取NameID,并构造Saml2AuthenticatedPrincipal。然后,它把委托人和当权者归为Saml2Authentication。
得到的Authentication#getPrincipal是一个 Spring securitySaml2AuthenticatedPrincipal对象,并且Authentication#getName映射到第一个断言的NameID元素。Saml2AuthenticatedPrincipal#getRelyingPartyRegistrationId保存了关联RelyingPartyRegistration的[标识符](# Servlet-saml2login-relyingpartyregistrationID)。
# 定制OpenSAML配置
同时使用 Spring Security和OpenSAML的任何类都应该在类的开头静态初始化OpenSamlInitializationService,如下所示:
Java
static {
	OpenSamlInitializationService.initialize();
}
Kotlin
companion object {
    init {
        OpenSamlInitializationService.initialize()
    }
}
这取代了OpenSAML的InitializationService#initialize。
有时,定制OpenSAML构建、Marshalls和unmarshallsSAML对象的方式是很有价值的。在这种情况下,你可能希望调用OpenSamlInitializationService#requireInitialize(Consumer),这样就可以访问OpenSAML的XMLObjectProviderFactory。
例如,当发送未签名的authnrequest时,你可能希望强制进行重新身份验证。在这种情况下,你可以注册自己的AuthnRequestMarshaller,如下所示:
Java
static {
    OpenSamlInitializationService.requireInitialize(factory -> {
        AuthnRequestMarshaller marshaller = new AuthnRequestMarshaller() {
            @Override
            public Element marshall(XMLObject object, Element element) throws MarshallingException {
                configureAuthnRequest((AuthnRequest) object);
                return super.marshall(object, element);
            }

            public Element marshall(XMLObject object, Document document) throws MarshallingException {
                configureAuthnRequest((AuthnRequest) object);
                return super.marshall(object, document);
            }

            private void configureAuthnRequest(AuthnRequest authnRequest) {
                authnRequest.setForceAuthn(true);
            }
        }

        factory.getMarshallerFactory().registerMarshaller(AuthnRequest.DEFAULT_ELEMENT_NAME, marshaller);
    });
}
Kotlin
companion object {
    init {
        OpenSamlInitializationService.requireInitialize {
            val marshaller = object : AuthnRequestMarshaller() {
                override fun marshall(xmlObject: XMLObject, element: Element): Element {
                    configureAuthnRequest(xmlObject as AuthnRequest)
                    return super.marshall(xmlObject, element)
                }

                override fun marshall(xmlObject: XMLObject, document: Document): Element {
                    configureAuthnRequest(xmlObject as AuthnRequest)
                    return super.marshall(xmlObject, document)
                }

                private fun configureAuthnRequest(authnRequest: AuthnRequest) {
                    authnRequest.isForceAuthn = true
                }
            }
            it.marshallerFactory.registerMarshaller(AuthnRequest.DEFAULT_ELEMENT_NAME, marshaller)
        }
    }
}
每个应用程序实例只能调用requireInitialize方法一次。
# 覆盖或替换Boot Auto配置
Spring Boot为依赖方生成两个@Beans。
第一种是将应用程序配置为依赖方的WebSecurityConfigurerAdapter。当包含spring-security-saml2-service-provider时,WebSecurityConfigurerAdapter看起来像:
例1.默认的JWT配置
Java
protected void configure(HttpSecurity http) {
    http
        .authorizeHttpRequests(authorize -> authorize
            .anyRequest().authenticated()
        )
        .saml2Login(withDefaults());
}
Kotlin
fun configure(http: HttpSecurity) {
    http {
        authorizeRequests {
            authorize(anyRequest, authenticated)
        }
        saml2Login { }
    }
}
如果应用程序不公开WebSecurityConfigurerAdapter Bean,那么 Spring 引导将公开上面的默认引导。
你可以通过在应用程序中公开 Bean 来替换此选项:
例2.自定义SAML2.0登录配置
Java
@EnableWebSecurity
public class MyCustomSecurityConfiguration extends WebSecurityConfigurerAdapter {
    protected void configure(HttpSecurity http) {
        http
            .authorizeHttpRequests(authorize -> authorize
                .mvcMatchers("/messages/**").hasAuthority("ROLE_USER")
                .anyRequest().authenticated()
            )
            .saml2Login(withDefaults());
    }
}
Kotlin
@EnableWebSecurity
class MyCustomSecurityConfiguration : WebSecurityConfigurerAdapter() {
    override fun configure(http: HttpSecurity) {
        http {
            authorizeRequests {
                authorize("/messages/**", hasAuthority("ROLE_USER"))
                authorize(anyRequest, authenticated)
            }
            saml2Login {
            }
        }
    }
}
对于任何以/messages/开头的URL,上面要求USER的角色。
第二个@Bean Spring 引导创建的是一个[RelyingPartyRegistrationRepository](https://DOCS. Spring.io/ Spring-security/site/DOCS/5.6.2/api/org/springframework/security/saml2/provider/service/registration/registrationpartyregistrationrepository.html),它代表了主张方和依赖方的元数据。这包括诸如依赖方在请求断言方验证时应使用的SSO端点的位置之类的内容。
你可以通过发布自己的RelyingPartyRegistrationRepository Bean 来覆盖默认值。例如,你可以通过点击其元数据端点来查找断言一方的配置,如下所示:
例3.依赖方注册存储库
Java
@Value("${metadata.location}")
String assertingPartyMetadataLocation;

@Bean
public RelyingPartyRegistrationRepository relyingPartyRegistrations() {
    RelyingPartyRegistration registration = RelyingPartyRegistrations
            .fromMetadataLocation(assertingPartyMetadataLocation)
            .registrationId("example")
            .build();
    return new InMemoryRelyingPartyRegistrationRepository(registration);
}
Kotlin
@Value("\${metadata.location}")
var assertingPartyMetadataLocation: String? = null

@Bean
open fun relyingPartyRegistrations(): RelyingPartyRegistrationRepository? {
    val registration = RelyingPartyRegistrations
        .fromMetadataLocation(assertingPartyMetadataLocation)
        .registrationId("example")
        .build()
    return InMemoryRelyingPartyRegistrationRepository(registration)
}
registrationId是你选择的用于区分注册的任意值。 |
|---|
或者,你可以手动提供每个细节,如下所示:
例4.依赖方注册存储库手动配置
Java
@Value("${verification.key}")
File verificationKey;

@Bean
public RelyingPartyRegistrationRepository relyingPartyRegistrations() throws Exception {
    X509Certificate certificate = X509Support.decodeCertificate(this.verificationKey);
    Saml2X509Credential credential = Saml2X509Credential.verification(certificate);
    RelyingPartyRegistration registration = RelyingPartyRegistration
            .withRegistrationId("example")
            .assertingPartyDetails(party -> party
                .entityId("https://idp.example.com/issuer")
                .singleSignOnServiceLocation("https://idp.example.com/SSO.saml2")
                .wantAuthnRequestsSigned(false)
                .verificationX509Credentials(c -> c.add(credential))
            )
            .build();
    return new InMemoryRelyingPartyRegistrationRepository(registration);
}
Kotlin
@Value("\${verification.key}")
var verificationKey: File? = null

@Bean
open fun relyingPartyRegistrations(): RelyingPartyRegistrationRepository {
    val certificate: X509Certificate? = X509Support.decodeCertificate(verificationKey!!)
    val credential: Saml2X509Credential = Saml2X509Credential.verification(certificate)
    val registration = RelyingPartyRegistration
        .withRegistrationId("example")
        .assertingPartyDetails { party: AssertingPartyDetails.Builder ->
            party
                .entityId("https://idp.example.com/issuer")
                .singleSignOnServiceLocation("https://idp.example.com/SSO.saml2")
                .wantAuthnRequestsSigned(false)
                .verificationX509Credentials { c: MutableCollection<Saml2X509Credential?> ->
                    c.add(
                        credential
                    )
                }
        }
        .build()
    return InMemoryRelyingPartyRegistrationRepository(registration)
}
请注意,X509Support是一个OpenSAML类,在这里的代码片段中使用它是为了简洁 |
|---|
或者,你可以使用DSL直接连接存储库,这也将覆盖自动配置的WebSecurityConfigurerAdapter:
例5.自定义依赖方注册DSL
Java
@EnableWebSecurity
public class MyCustomSecurityConfiguration extends WebSecurityConfigurerAdapter {
    protected void configure(HttpSecurity http) {
        http
            .authorizeHttpRequests(authorize -> authorize
                .mvcMatchers("/messages/**").hasAuthority("ROLE_USER")
                .anyRequest().authenticated()
            )
            .saml2Login(saml2 -> saml2
                .relyingPartyRegistrationRepository(relyingPartyRegistrations())
            );
    }
}
Kotlin
@EnableWebSecurity
class MyCustomSecurityConfiguration : WebSecurityConfigurerAdapter() {
    override fun configure(http: HttpSecurity) {
        http {
            authorizeRequests {
                authorize("/messages/**", hasAuthority("ROLE_USER"))
                authorize(anyRequest, authenticated)
            }
            saml2Login {
                relyingPartyRegistrationRepository = relyingPartyRegistrations()
            }
        }
    }
}
通过在RelyingPartyRegistrationRepository中注册多个依赖方,依赖方可以是多租户。 |
|---|
# RelyingPartyRegistration
[RelyingPartyRegistration](https://DOCS. Spring.io/ Spring-security/site/DOCS/5.6.2/api/org/springframework/security/saml2/provider/service/registration/registration/relypartyregistration.html)实例表示依赖方和断言方元数据之间的链接。
在RelyingPartyRegistration中,你可以提供依赖方的元数据,比如它的Issuer值,它希望将SAML响应发送到该值,以及它为签名或解密有效负载而OWNS的任何凭据。
此外,你还可以提供断言方元数据,比如它的Issuer值(它期望向其发送authnrequests),以及它为依赖方验证或加密有效负载而OWNS的任何公共凭据。
以下RelyingPartyRegistration是大多数设置所需的最低要求:
Java
RelyingPartyRegistration relyingPartyRegistration = RelyingPartyRegistrations
        .fromMetadataLocation("https://ap.example.org/metadata")
        .registrationId("my-id")
        .build();
Kotlin
val relyingPartyRegistration = RelyingPartyRegistrations
    .fromMetadataLocation("https://ap.example.org/metadata")
    .registrationId("my-id")
    .build()
请注意,你也可以从任意的InputStream源创建RelyingPartyRegistration。一个这样的例子是当元数据存储在数据库中时:
String xml = fromDatabase();
try (InputStream source = new ByteArrayInputStream(xml.getBytes())) {
    RelyingPartyRegistration relyingPartyRegistration = RelyingPartyRegistrations
            .fromMetadata(source)
            .registrationId("my-id")
            .build();
}
尽管更复杂的设置也是可能的,比如:
Java
RelyingPartyRegistration relyingPartyRegistration = RelyingPartyRegistration.withRegistrationId("my-id")
        .entityId("{baseUrl}/{registrationId}")
        .decryptionX509Credentials(c -> c.add(relyingPartyDecryptingCredential()))
        .assertionConsumerServiceLocation("/my-login-endpoint/{registrationId}")
        .assertingPartyDetails(party -> party
                .entityId("https://ap.example.org")
                .verificationX509Credentials(c -> c.add(assertingPartyVerifyingCredential()))
                .singleSignOnServiceLocation("https://ap.example.org/SSO.saml2")
        )
        .build();
Kotlin
val relyingPartyRegistration =
    RelyingPartyRegistration.withRegistrationId("my-id")
        .entityId("{baseUrl}/{registrationId}")
        .decryptionX509Credentials { c: MutableCollection<Saml2X509Credential?> ->
            c.add(relyingPartyDecryptingCredential())
        }
        .assertionConsumerServiceLocation("/my-login-endpoint/{registrationId}")
        .assertingPartyDetails { party -> party
                .entityId("https://ap.example.org")
                .verificationX509Credentials { c -> c.add(assertingPartyVerifyingCredential()) }
                .singleSignOnServiceLocation("https://ap.example.org/SSO.saml2")
        }
        .build()
顶级元数据方法是关于依赖方的详细信息。assertingPartyDetails中的方法是关于断言方的详细信息。 |
|---|
| 依赖方期望SAML响应的位置是断言消费者服务位置。 |
|---|
依赖方的entityId的默认值是{baseUrl}/saml2/service-provider-metadata/{registrationId}。这是在配置主张方以了解你的依赖方时所需的值。
assertionConsumerServiceLocation的默认值是/login/saml2/sso/{registrationId}。默认情况下,它被映射到过滤器链中的[Saml2WebSsoAuthenticationFilter](# Servlet-SAML2login-Authentication-SAML2WebssoAuthenticationFilter)。
# URI模式
你可能在上面的示例中注意到了{baseUrl}和{registrationId}占位符。
这些对于生成URI非常有用。因此,依赖方的entityId和assertionConsumerServiceLocation支持以下占位符:
baseUrl-已部署应用程序的方案、主机和端口registrationId-此依赖方的注册IDbaseScheme-已部署应用程序的方案baseHost-已部署应用程序的主机basePort-已部署应用程序的端口
例如,上面定义的assertionConsumerServiceLocation是:
/my-login-endpoint/{registrationId}
在已部署的应用程序中,它将转换为
/my-login-endpoint/adfs
上述entityId定义为:
{baseUrl}/{registrationId}
在已部署的应用程序中,它将转换为
https://rp.example.com/adfs
# 证书
你还可能注意到了所使用的凭据。
通常情况下,依赖方将使用相同的密钥对有效载荷进行签名和解密。或者,它将使用相同的密钥来验证有效负载并对其进行加密。
因此, Spring Security附带Saml2X509Credential,这是一种特定于SAML的凭据,它简化了针对不同用例配置相同密钥的过程。
至少,有必要获得申述方的证明,这样申述方的签名回复才能得到验证。
要构造一个Saml2X509Credential来验证来自断言一方的断言,你可以加载该文件并使用CertificateFactory,如下所示:
Java
Resource resource = new ClassPathResource("ap.crt");
try (InputStream is = resource.getInputStream()) {
    X509Certificate certificate = (X509Certificate)
            CertificateFactory.getInstance("X.509").generateCertificate(is);
    return Saml2X509Credential.verification(certificate);
}
Kotlin
val resource = ClassPathResource("ap.crt")
resource.inputStream.use {
    return Saml2X509Credential.verification(
        CertificateFactory.getInstance("X.509").generateCertificate(it) as X509Certificate?
    )
}
让我们假设,主张权利的一方也将对主张进行加密。在这种情况下,依赖方将需要一个私钥来解密加密值。
在这种情况下,你将需要一个RSAPrivateKey及其对应的X509Certificate。你可以使用 Spring Security的RsaKeyConverters实用程序类加载第一个,然后像以前一样加载第二个:
Java
X509Certificate certificate = relyingPartyDecryptionCertificate();
Resource resource = new ClassPathResource("rp.crt");
try (InputStream is = resource.getInputStream()) {
    RSAPrivateKey rsa = RsaKeyConverters.pkcs8().convert(is);
    return Saml2X509Credential.decryption(rsa, certificate);
}
Kotlin
val certificate: X509Certificate = relyingPartyDecryptionCertificate()
val resource = ClassPathResource("rp.crt")
resource.inputStream.use {
    val rsa: RSAPrivateKey = RsaKeyConverters.pkcs8().convert(it)
    return Saml2X509Credential.decryption(rsa, certificate)
}
| 当你将这些文件的位置指定为适当的 Spring 引导属性时, Spring 引导将为你执行这些转换。 |
|---|
# 从请求中解决依赖方
到目前为止, Spring Security通过在URI路径中查找注册ID来解析RelyingPartyRegistration。
你可能想要定制的原因有很多。其中:
你可能知道你永远不会是一个多租户应用程序,因此希望有一个更简单的URL方案
你可以通过URI路径以外的方式来识别租户。
要定制解析RelyingPartyRegistration的方式,可以配置自定义的RelyingPartyRegistrationResolver。默认值从URI的Last PATH元素中查找注册ID,并在RelyingPartyRegistrationRepository中查找它。
你可以提供一个更简单的解析器,例如,它总是返回相同的依赖方:
Java
public class SingleRelyingPartyRegistrationResolver implements RelyingPartyRegistrationResolver {

    private final RelyingPartyRegistrationResolver delegate;

    public SingleRelyingPartyRegistrationResolver(RelyingPartyRegistrationRepository registrations) {
        this.delegate = new DefaultRelyingPartyRegistrationResolver(registrations);
    }

    @Override
    public RelyingPartyRegistration resolve(HttpServletRequest request, String registrationId) {
        return this.delegate.resolve(request, "single");
    }
}
Kotlin
class SingleRelyingPartyRegistrationResolver(delegate: RelyingPartyRegistrationResolver) : RelyingPartyRegistrationResolver {
    override fun resolve(request: HttpServletRequest?, registrationId: String?): RelyingPartyRegistration? {
        return this.delegate.resolve(request, "single")
    }
}
然后,你可以将此解析器提供给适当的过滤器,这些过滤器可以[产生<saml2:AuthnRequest>s](authentication-requests.html# Servlet-saml2login-sp-initiated-factory),[authenticate<saml2:Response>s](authentication.html# Servlet-saml2login-authenticate-responses-responses),和[产生<saml2:SPSSODescriptor>元数据](../metadata.html# Servlet-saml2
请记住,如果你的RelyingPartyRegistration中有任何占位符,那么你的解析器实现应该解析它们。 |
|---|
# 重复的依赖方配置
当应用程序使用多个断言对象时,在RelyingPartyRegistration实例之间会重复一些配置:
依赖方的
entityId其
assertionConsumerServiceLocation,以及它的凭据,例如它的签名或解密凭据
这种设置的好处是,对于某些身份提供者来说,证书的轮换可能比其他身份提供者更容易。
复制可以通过几种不同的方式来减轻。
首先,在YAML中,可以通过引用来缓解这种情况,例如:
spring:
  security:
    saml2:
      relyingparty:
        okta:
          signing.credentials: &relying-party-credentials
            - private-key-location: classpath:rp.key
              certificate-location: classpath:rp.crt
          identityprovider:
            entity-id: ...
        azure:
          signing.credentials: *relying-party-credentials
          identityprovider:
            entity-id: ...
其次,在数据库中,不需要复制RelyingPartyRegistration的模型。
第三,在 Java 中,你可以创建一个自定义的配置方法,例如:
Java
private RelyingPartyRegistration.Builder
        addRelyingPartyDetails(RelyingPartyRegistration.Builder builder) {

    Saml2X509Credential signingCredential = ...
    builder.signingX509Credentials(c -> c.addAll(signingCredential));
    // ... other relying party configurations
}

@Bean
public RelyingPartyRegistrationRepository relyingPartyRegistrations() {
    RelyingPartyRegistration okta = addRelyingPartyDetails(
            RelyingPartyRegistrations
                .fromMetadataLocation(oktaMetadataUrl)
                .registrationId("okta")).build();

    RelyingPartyRegistration azure = addRelyingPartyDetails(
            RelyingPartyRegistrations
                .fromMetadataLocation(oktaMetadataUrl)
                .registrationId("azure")).build();

    return new InMemoryRelyingPartyRegistrationRepository(okta, azure);
}
Kotlin
private fun addRelyingPartyDetails(builder: RelyingPartyRegistration.Builder): RelyingPartyRegistration.Builder {
    val signingCredential: Saml2X509Credential = ...
    builder.signingX509Credentials { c: MutableCollection<Saml2X509Credential?> ->
        c.add(
            signingCredential
        )
    }
    // ... other relying party configurations
}

@Bean
open fun relyingPartyRegistrations(): RelyingPartyRegistrationRepository? {
    val okta = addRelyingPartyDetails(
        RelyingPartyRegistrations
            .fromMetadataLocation(oktaMetadataUrl)
            .registrationId("okta")
    ).build()
    val azure = addRelyingPartyDetails(
        RelyingPartyRegistrations
            .fromMetadataLocation(oktaMetadataUrl)
            .registrationId("azure")
    ).build()
    return InMemoryRelyingPartyRegistrationRepository(okta, azure)
}